Showing posts with label upcycled. Show all posts

Wednesday, February 2, 2011

Boutique-Style Girl Outfit from Thrifted Pillowcases!


We are stuck in the middle of 12" of snow! Anyone else? I feel like I have been waiting for a day like this since the last blizzard. You can stay in your jammies, watch cartoons with the kids all day and sew--guilt free.

Of course, we did venture outside for about 5 minutes. Here's Finn, playing in snow drifts nearly as tall as he is:


Anyway, I had to have a sewing project for the day. Did I work on my quilt? No. Did I work on my table topper? No. Did I finish any of the other many projects I need to? No. I started a completely new one.

First I took these 2 gigantic pillowcases I found at Goodwill a month ago:


I started by cutting off the edging. I saved these for the straps, sash, and leg ruffles:

And after about a day of work, I made this!


Back view:


I want to point out that this is a 100% recycled outfit. I even used the elastic that I cut off a fitted sheet that I'm using for another project. And the flowers in her hair? Scrapped quilt batting.

Sorry there isn't a full-on tutorial for this. I basically followed McCalls pattern M6017, but added on a few embellishments, like the leg ruffles, the knotted straps, the extra ruffle on the shirt, and the sash:


Did I mention that I had a little helper?:


I will be linking up to these great parties! And I would like to point out that The T-Shirt Diaries has an awesome upcycled link party every week. She's trying to reach 100 links this week, so go link up and check it out!


Sunday, January 30, 2011

My Little Love Bug

Kiki got some adorable lady bug leggings for Christmas, however, she didn't have a shirt to match! I finally got around to making her one today.

Her favorite pose lately:


I went to Goodwill and picked up a plain red shirt (yep, that's where hubby and I went for our date night!) and added some black heat transfer. But it wasn't quite enough.

(Sorry about the horrible pictures. Yesterday it was 70 and sunny, today it is back to being 30 and dark. Also, it seems I have to use the flash to get a non-fuzzy pic of this busy lady):


I added a few little bows on the sleeves and ladybug and then some ric-rac to the bottom. Viola! Another adorable V-Day outfit!


I will be linking up to these great parties!

Tuesday, January 4, 2011

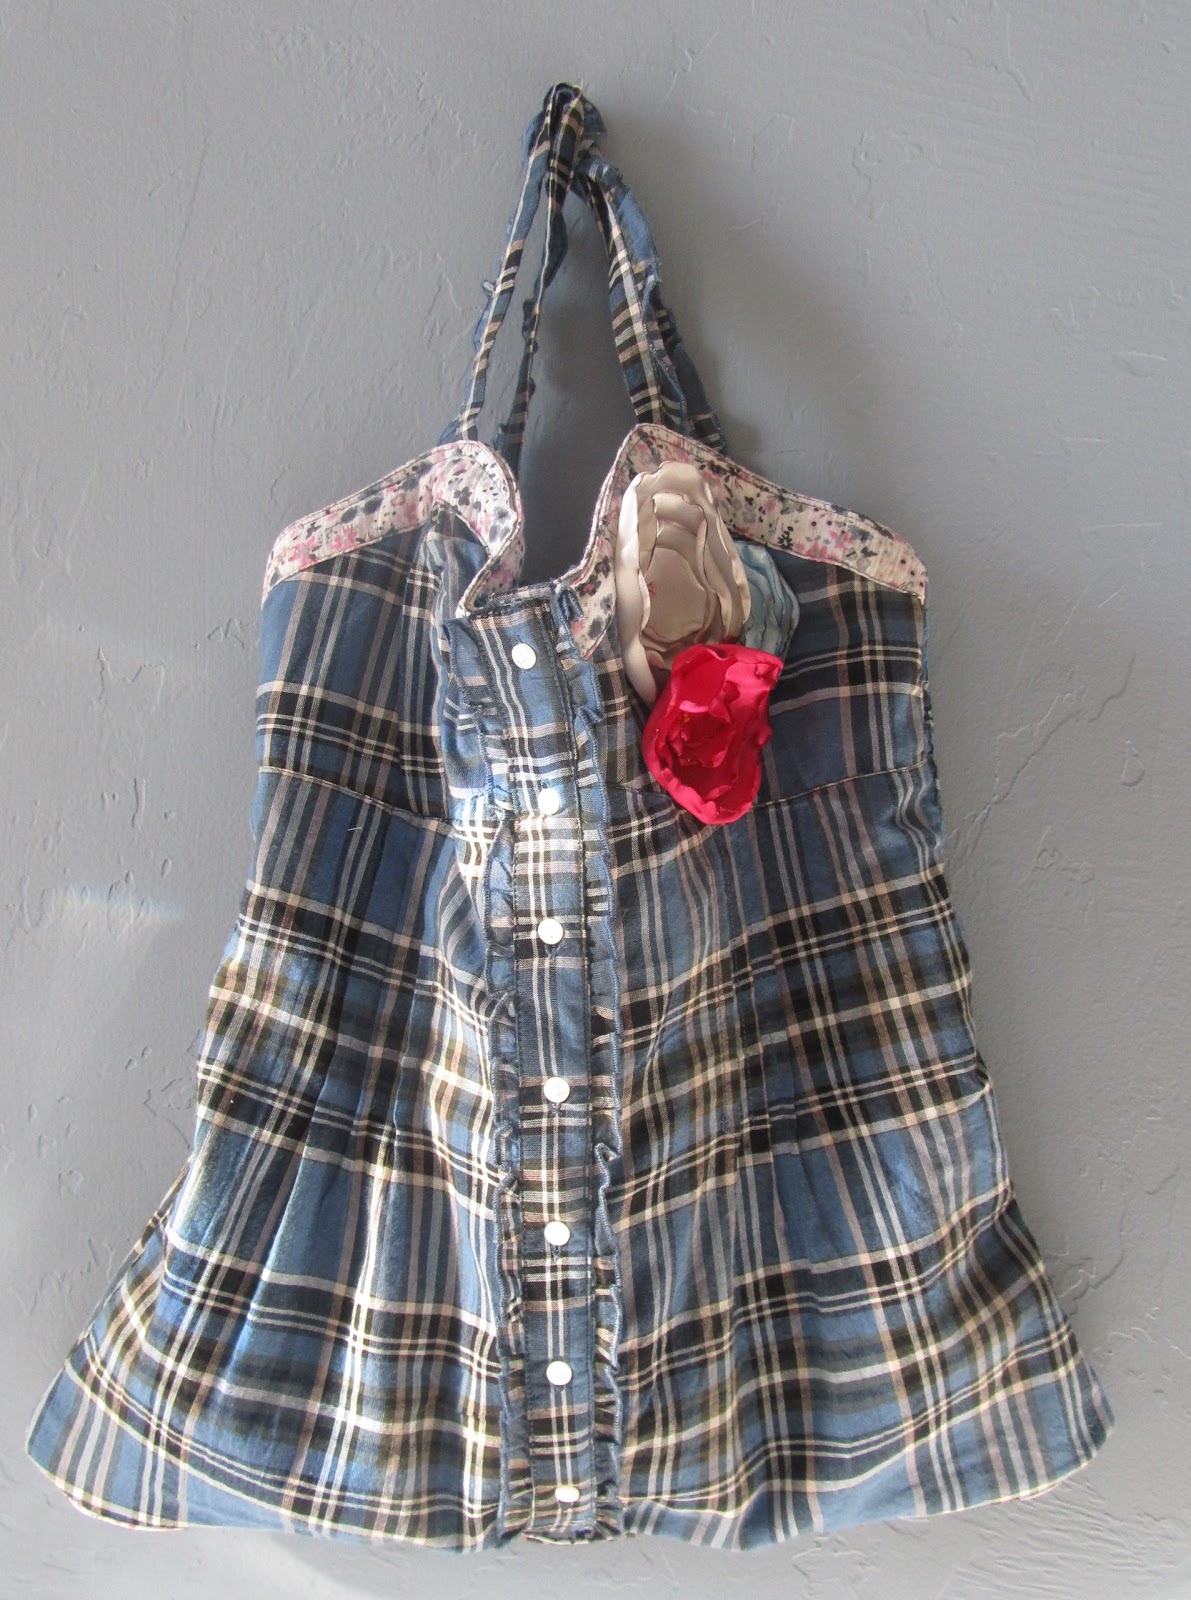
Quick Tank-Top Tote


Now that I've done one clothing transformation, I thought I might be up for another. My sister is starting college soon and it was her birthday this week, so I wanted to make her a little tote for her books. She's a bit younger than me (by 9 years), so she can still pull off some of the cute, trendy stuff that I can't. Therefore, I made her a little tank-top tote! I hope she likes it!

This was really super quick. I made it in about an hour, and that included all my trial and error process (about half-way through I realized I did a few steps that were COMPLETELY unnecessary). What you will need:

-Two identical tank tops (mine were from Charlotte Russe)
-coordinating thread
-any embellishments you want to add. I added some silk burnt flowers.
That's it!

Here's my two tanks:


If you bought button-downs like I did, you'll first want to sew down the front to close any gaps between the buttons. You don't want anything falling out of the tote! Sew on one of the existing top-stitches if possible, with coordinating thread:


Next, turn one tank top inside out. Make sure the one you turn inside out is the one you will want on the outside of your tote (probably won't matter if they are identical, but if the gap-stitching from above looks wonky on one, this is a great time to hide it):


Slip the inside-out tank inside the right-side out tank. Line them up really well and pin all the bottom edges together. You'll be pinning through four layers of fabric:


Sew a straight line across the bottom:


 Turn your tote right-side out now. Line up the top of your shirts well and pin all the way around. This is the opening of your tote, so you'll only be stitching two layers together, all around the top:


Now stitch these layers together. Try to make it as neat as possible. My existing top-stitch line was too close to the edge for me to follow it, so I just stitched about 1/8 inch in:


At this point, I cut off the two superfluous straps:


Add your embellishments and you're done! Easy, right? 


This could be made even easier by just using one tank-top, but I wanted mine to be a little heftier, which is why I used two.

And, of course, I have to show off what I made with the Silhouette today. Birthday cards! I actually have two relatives with birthdays this week, so I made two versions:


Happy Sewing!

Linking up to these great parties.

Sunday, November 7, 2010

I Roared!


One of my favorite blogs is I Am Momma Hear Me Roar! Cheri has so many great ideas. I saw her posts for an upcycled hat and upcycled dress and, once again, I knew I was destined to make them.

Here's Kiki in her adorable new Princess hat:


And her new dress! I love the scrappy look of it. I wanted to use some cool graphic shirts, but I really only had plain ones. I plan on adding some stamps with fabric paint (a la IAMHMR), but that would require me actually taking a shower, getting dressed, getting the kids dressed and then moving my butt up to Walmart to get the paint--something I don't plan on doing for a few more hours.

I made one for Finn as well, and he loved it UNTIL he realized I cut up one of his old shirts to make it. Then he was just really really pissed and tried to throw it away. It wasn't even a shirt that he liked to wear AND it was too small for him now anyway. Dear Boy: I love you, but you have some major control issues. Unfortunately, I know where you get that trait.
Here I am wearing it instead:

Related Posts Plugin for WordPress, Blogger...