Showing posts with label picture frame. Show all posts

Wednesday, January 19, 2011

Kiki's Valentine

  
Really, this isn't a valentine, but it's appropriate for Valentine's Day, don't you think?

One day, my daughter told me she was scared of this picture, hanging in her room:


Did I mention she's 2? She's "scared" of a lot of stuff. So I took it down. As I was laying in bed that night, I started thinking about new ways I could re-use the frame and matting. (Side note: Don't you notice that the best ideas come while laying in bed, trying to go to sleep? It's really the Golden Hour). It came to me that I should made a fabric picture out of the same BEAUTIFUL Lakehouse fabrics I used on her bunting.

However, that picture was professionally framed. It was a real bear to take apart. When I finally ripped it from the frame, I realized that the print was permanently attached to the matting. Scratch that idea.

So I went with a new frame. Actually, a re-purposed frame that my hubby brought me. I used acrylic paint to paint the shiny surface, but it did not turn out. I decided to sand it down and start over, but I ended up sort of liking the sanded, shabby look. So I kept it.

I used my reverse applique method to cut out and attach the letters and heart. I keep thinking I should add some sort of stitching to it, but I haven't decided where yet.

I love it! It goes great in her room, and I think it pretty much sums up exactly how I feel about my little Kiki :)


 Here's my little munchkin:


AND, I bought MORE Lakehouse fabric (sorry about all the caps, I'm just really excited about it!) to make her a new quilt! I haven't cut them yet, I'm still in the hugging and staring phase.

I'll be linking up to these great parties!

Monday, January 17, 2011

Fun With Frames


My hubby works for a bakery and he's been bringing me all sorts of goodies lately. I'm not talking the sweet, chocolate-filled kind. I mean leftovers. Leftover ribbon, leftover boxes, leftover frames. All things that the company has discontinued using. It's awesome.

He brought me one the other day that was a good color for the kitchen. So I made this:

I am in love with the Early Bird fabric line from Cosmo Cricket and while I was shopping etsy for it one day, I found these lovely scrapbook tags instead. I didn't really know what to do with them, but they were cheap, so I snatched them up!
When hubby brought home this frame, I knew I had found my project:

Aren't they cute? Double-sided too:


The frame was a bit roughed-up, so I took a piece of sandpaper to it, just to make sure it looks intentionally scratchy:


I used spray adhesive to tack down my tags and flowers. Then I adhered it to somem leftover corkboard peices:


I used the cork so that I could put some pins in the tags (so that they'd look specimin-like):


I think it's a nice way to dress up the white space!


That's not the only framed project I've been working on though. I re-made an old, ugly corkboard into a new inspiration board for my sewing table: 


I got the idea from Tatertots & Jello.

I will be linking up to these great parties this week! And don't forget to come back on Friday and link up anything you've been working on too!

Sunday, January 16, 2011

A Few Things I Forgot & a Winner!

I'm in the middle of a lot of projects at the moment, so I don't really have much to share today. I feel like I've been sitting on this pictures for a time just like this!

This is a rocket pillow I made for Finn for Christmas. Perfect for his space room! The pattern is from a great book called One Yard Wonders.


These are the scarves I made for the whole family at Christmas. The first three are from Living with Punks and the
the final one (mine) I made with leftover quilting scraps. I've gotten a lot of complements on it!


I'm a little addicted to making these frames lately. We always get a certain portrait package at Christmas and it comes with a 10" x 13" picture that I never hang because I don't have a big enough frame. I made this one for it to go on my entry table. The fabric flower is made from leftover quilt batting scraps.


And finally I made a frame for Finn's room. Another space-themed entry.


And I am very happy to announce that the winner of the Valentine picture frame is Crystal from Our Path Thru Life! I will be contacting you for your info so I can get your frame out to you in time for V-Day!

By the way, I am raising money through the OKC Rock-N-Bowl for Junior Achievement. This is a great organization that helps prepare youth for the real world by educating them about finance and economics. If you would like to donate I have a widget on the right-side of my blog. I guarantee that your money will go to a great organization!


I am sharing this on a great blog:


A Craft A Day


Saturday, January 1, 2011

Painted Picture Frame Tutorial

 My mother-in-law is a very special person. And I'm not just saying that because she and my husband both chipped in to buy me my Silhouette for Christmas. She is the type of person that lives life to the fullest. She has unlimited energy when it comes to playing with her grand kids, she cares deeply about everyone she knows, and she's always been an excellent mother-in-law. I occasionally gripe at her for bringing over too many toys for the kids (she is exceptionally fond of the ones that have 40 tiny little parts), but I think she knows I love her :)

On top of all that, she is a teacher. A Special Education teacher, in fact. I knew when she gave me the machine that I wanted one of my first Silhouette projects to be for her classroom.

Every year she takes her class to the Special Olympics and usually she takes a picture of them all together. I thought a personalized picture frame might be a good way for her to display it!


To make this, you will need:

- a wooden board, mine was roughly 10" x 13", from the craft store
-Paint (I used a little bottle of acrylic)
-Cardstock
-felt
-ribbon
-glue gun
-Popsicle stick
-clothespin

First, paint your board.


While you're at it, paint your clothespin and Popsicle stick. Ignore that little wood nub there, it was an abandoned idea. Let's just pretend it's a Popsicle stick, kay?

My paint choice:

While that dries, fire up your Silhouette software, or whatever you plan on using to cut your letters.

Print. Or cut. Or whatever.

Place them on your newly dried board (that acrylic dries FAST!) and Mod Podge them on. Puh-lease do not make the same mistake as me and use a dirty brush. Now her board has a light dusting of glitter. Ick.

Cut out felt shapes using this template, courtesy of Tatertots & Jello. I like to cut 7 flower shapes, plus one 1 x 1 inch square for backing.

Take a flower, dab a little hot glue in the center (yes, I am totally doing this on a framed painting. My craft table is a little cluttered at the moment).

Fold in half:

Dab another drop of glue:

Fold in half again. Repeat for all your flower shapes:

Next, take your backing square and glue down 4 of your folded flowers. Here's mine with 3 of the 4 glued down:

And here it is with all four. Add a large dab of glue to the center:

Pinch together the ends of your remaining 3 "petals" and stick it on the glue dallop. Voila! Flower is done:

Glue your Popsicle stick to the top of your frame on the back (I painted mine black first--well, halfway). Then hot glue the flower on the front of it:

You're almost done! Mine looked a little too clean. So I roughed up the edges a bit with some sandpaper. Then I mixed a little of the black acrylic paint with water and brushed over the letters. It gives it a more distressed look:


Add a little ribbon for a hanger (I hot-glued that as well). Mod-Podge a little bit of scrapbook paper to the clothespin and you are finished!:


Since it's New Year's Day and all, I decided to start on my resolution and relax a little. Kiki and the kitty were so tired that you'd think they were the ones crafting all day!


I will be linking up to these parties.

Thursday, December 30, 2010

Painted Picture Frame

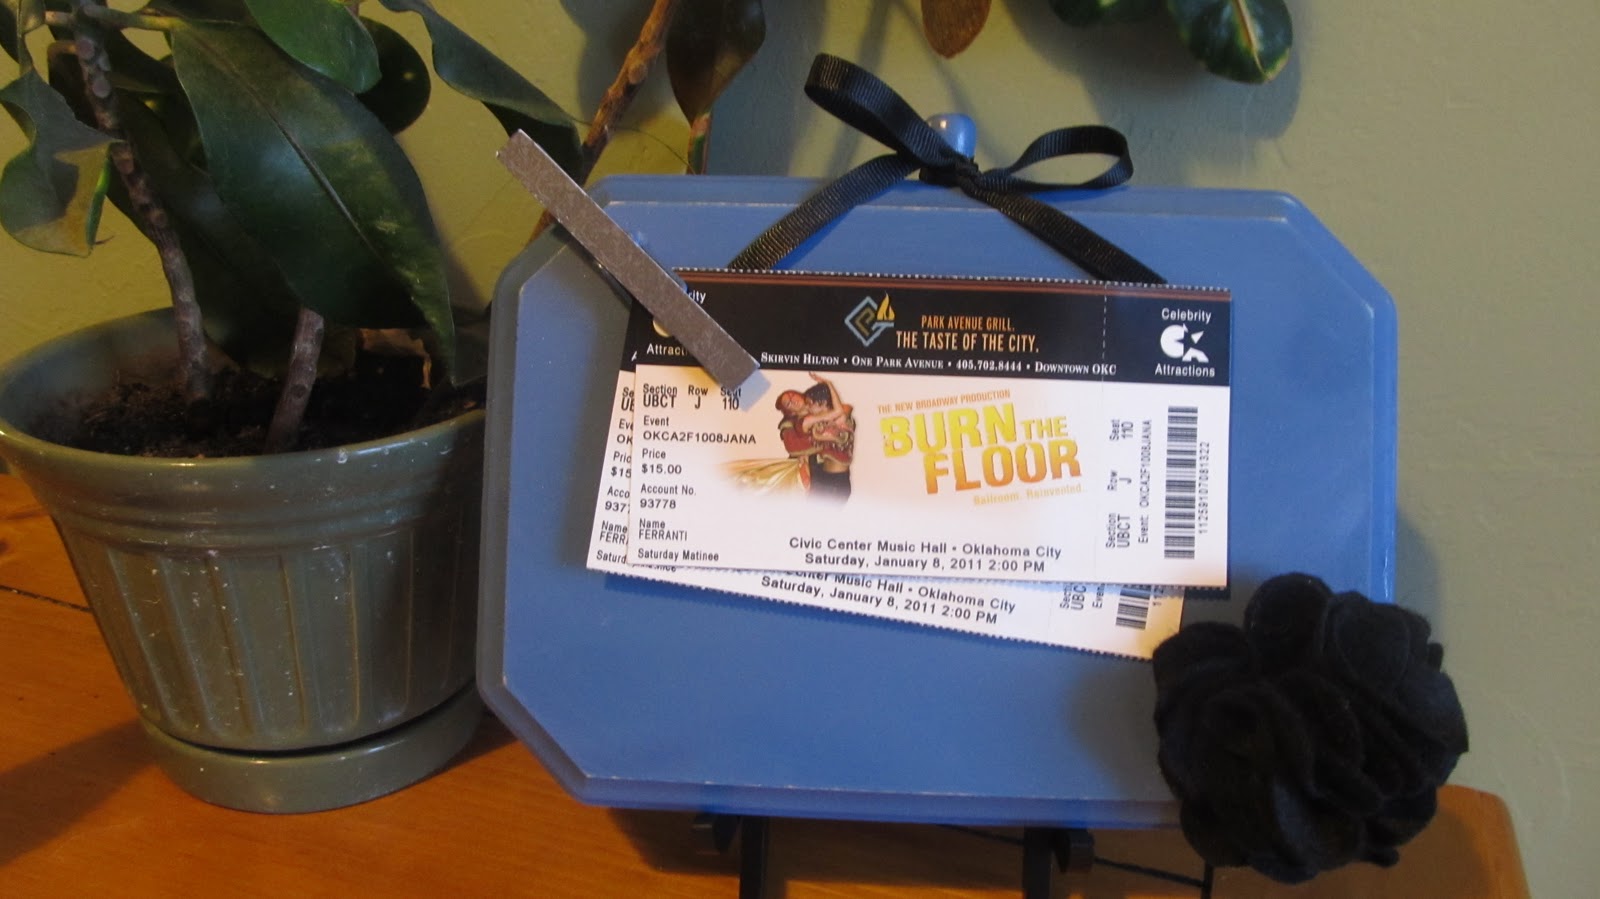
Remember my January to-do list? Well, it's not even the end of December yet and I've already crossed one off! I was inspired by these picture frames from Fingerprints on the Fridge and came up with this:


Cute right? I couldn't resist putting the pic of me and the lady herself on display. Really, this one is for my dear friend's birthday. But don't worry, I made one for myself too!

And I don't plan on gifting hers with that horrible picture. She gets concert tickets!:


Now that I have my Silhouette (came in last night!), I think I'll make more and add some cute vinyl.
Related Posts Plugin for WordPress, Blogger...