Showing posts with label gift. Show all posts

Tuesday, April 19, 2011

Teacher Appreciation {Quilted Wall-Hanging}


Teacher Appreciation week is coming up in May (AND the end of school--it has flown by!), so I figured it was the perfect time to make something handmade for my son's teacher. I've really wanted to make a quilt for her before Finn even started school, but I decided to pace myself and my patience paid off!

I've had the idea for this floating around in my head for awhile. I knew I wanted something with this sort of layout and size, but when I saw this at Moda Bake Shop, it sort of inspired me to get moving on putting this together. I didn't use their pattern at all, but it obviously has its similarities.

I especially love the back and binding. The rainbow colors worked well together. I hope she likes displaying it in her classroom.


I will be linking up to these great parties!

Tuesday, March 8, 2011

More Baby Gifts!


My very first wipes case! And, may I say, this was incredible easy! My friend says that ones like this go for  $30 at a local baby shop. Gets a girl to thinking...

I will be linking up to these great parties!

Sunday, February 6, 2011

Granny Love

Today is my Mother-in-Law's birthday. I know I've said it before, but this woman is amazingly helpful. She's always up for babysitting, taking the kids to play, or just basically anything that you suggest. She also chipped in to buy me my Silhouette for Christmas. Therefore, I try to make her things from it whenever I can now. Since I've been loving heat transfer lately, I thought I would make her a personalized Granny shirt!

(I know, I need to iron it before wrapping it up)


I did a little play on Subway Art. I think it works for Valentine's too!


I hope she likes it!

I'll be linking up to these great parties!

Thursday, February 3, 2011

Finn's Robot Valentines

We are going to be in Disney World on Valentine's Day, but that doesn't mean that Finn still can't have some awesome Valentine's for his class! I feel rather bad that he's missing his first Valentine's Day party at school (and I am the home-room mom), but the guilt kinda gets overshadowed by the fact that we're going to be in the happiest place on Earth instead.

Here's what I did:

Strung some Ju-Ju hearts on elastic thread. Then tied ribbon between them. Home-made candy bracelets!:


Then I wrapped them in Valentine baggies:


Rolled them up and wrapped them, cracker-style. I made his robot cards last week. I love the little glitter heart!


And on the back? His adorable 4-year-old signature:


I'll be linking up to these great parties!

Sunday, January 23, 2011

(More) Valentine's Stuff & Say It On the Wall Discount for You!

If you like to craft and decorate (which I assume is why you're here), then you probably love vinyl, right? Me too. Which is why I love Say It On the Wall. Not only do they have tons of great vinyl products, but they also have pictures of each to help inspire you on how to use them.

For example, my Valentine mailboxes. They are kinda exactly like the ones on the website...but they were just so cute on there that I had to recreate them.

I ordered my vinyl (it shipped quick too!), found some V-Day mailboxes at Target for $1, and hot glued a little ribbon on the edge. Easy!

I think I'll gift this one to Finn's teacher on V-Day--with a few gift certificates inside!


And I'm excited to say that Say It On the Wall is offering my readers 30% all Valentine-themed products through the month of February. Just use the code FAST30 at checkout!

Enjoy, and I'd love to see what you create! Make sure you come back and link it up on Linky Fridaze!


Fast Daze


I will be linking up with these great parties!

Tuesday, January 4, 2011

Quick Tank-Top Tote


Now that I've done one clothing transformation, I thought I might be up for another. My sister is starting college soon and it was her birthday this week, so I wanted to make her a little tote for her books. She's a bit younger than me (by 9 years), so she can still pull off some of the cute, trendy stuff that I can't. Therefore, I made her a little tank-top tote! I hope she likes it!

This was really super quick. I made it in about an hour, and that included all my trial and error process (about half-way through I realized I did a few steps that were COMPLETELY unnecessary). What you will need:

-Two identical tank tops (mine were from Charlotte Russe)
-coordinating thread
-any embellishments you want to add. I added some silk burnt flowers.
That's it!

Here's my two tanks:


If you bought button-downs like I did, you'll first want to sew down the front to close any gaps between the buttons. You don't want anything falling out of the tote! Sew on one of the existing top-stitches if possible, with coordinating thread:


Next, turn one tank top inside out. Make sure the one you turn inside out is the one you will want on the outside of your tote (probably won't matter if they are identical, but if the gap-stitching from above looks wonky on one, this is a great time to hide it):


Slip the inside-out tank inside the right-side out tank. Line them up really well and pin all the bottom edges together. You'll be pinning through four layers of fabric:


Sew a straight line across the bottom:


 Turn your tote right-side out now. Line up the top of your shirts well and pin all the way around. This is the opening of your tote, so you'll only be stitching two layers together, all around the top:


Now stitch these layers together. Try to make it as neat as possible. My existing top-stitch line was too close to the edge for me to follow it, so I just stitched about 1/8 inch in:


At this point, I cut off the two superfluous straps:


Add your embellishments and you're done! Easy, right? 


This could be made even easier by just using one tank-top, but I wanted mine to be a little heftier, which is why I used two.

And, of course, I have to show off what I made with the Silhouette today. Birthday cards! I actually have two relatives with birthdays this week, so I made two versions:


Happy Sewing!

Linking up to these great parties.

Saturday, January 1, 2011

Painted Picture Frame Tutorial

 My mother-in-law is a very special person. And I'm not just saying that because she and my husband both chipped in to buy me my Silhouette for Christmas. She is the type of person that lives life to the fullest. She has unlimited energy when it comes to playing with her grand kids, she cares deeply about everyone she knows, and she's always been an excellent mother-in-law. I occasionally gripe at her for bringing over too many toys for the kids (she is exceptionally fond of the ones that have 40 tiny little parts), but I think she knows I love her :)

On top of all that, she is a teacher. A Special Education teacher, in fact. I knew when she gave me the machine that I wanted one of my first Silhouette projects to be for her classroom.

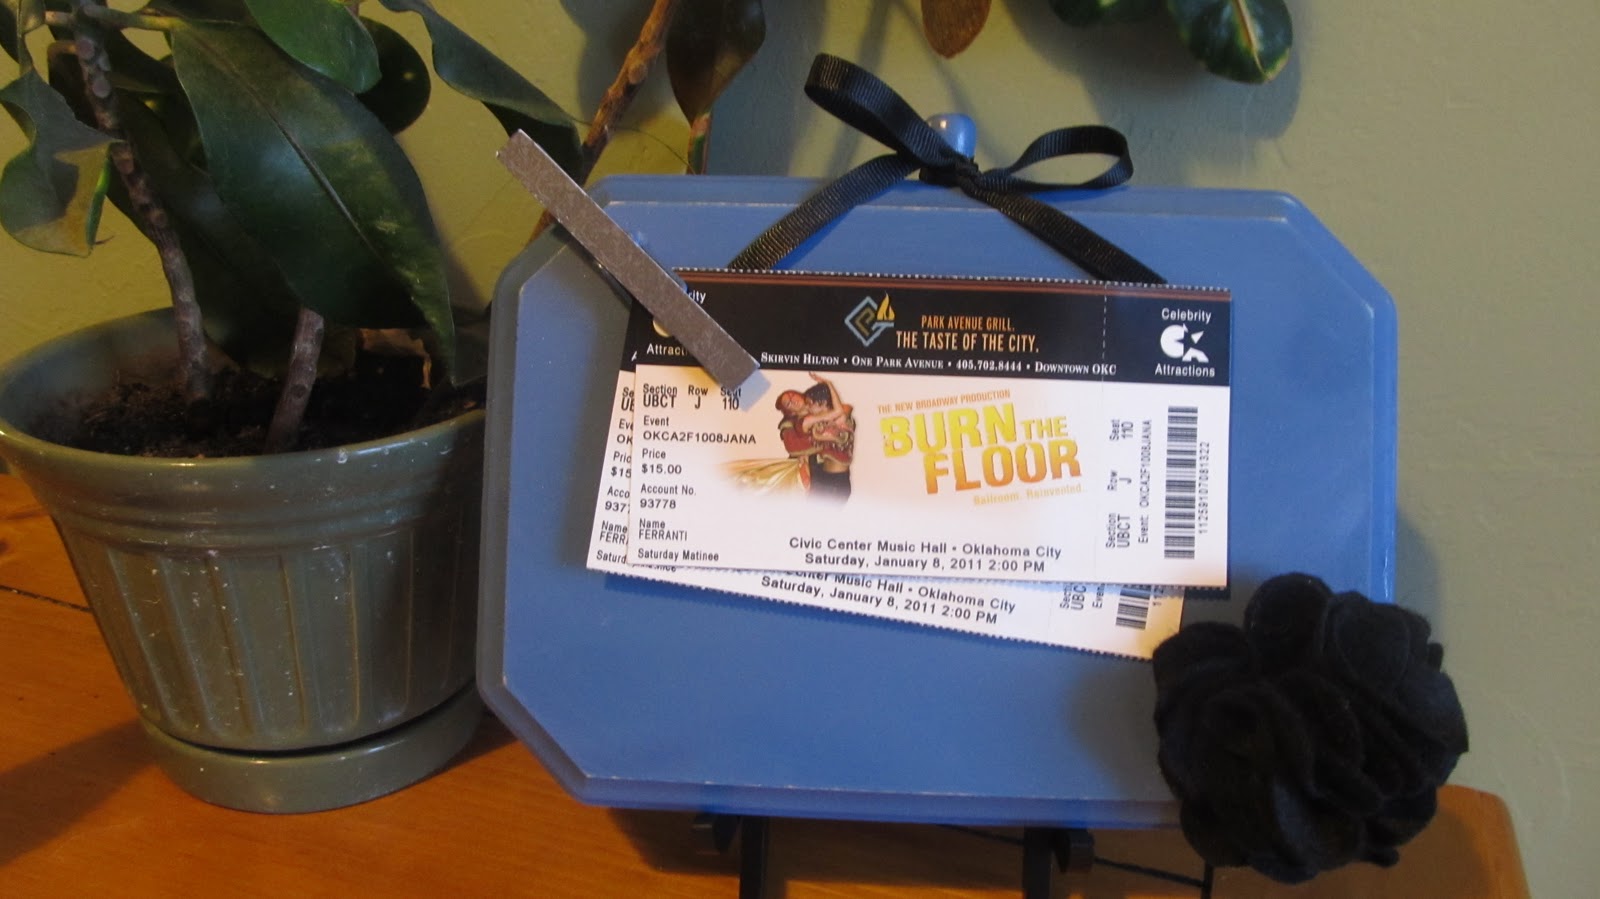
Every year she takes her class to the Special Olympics and usually she takes a picture of them all together. I thought a personalized picture frame might be a good way for her to display it!


To make this, you will need:

- a wooden board, mine was roughly 10" x 13", from the craft store
-Paint (I used a little bottle of acrylic)
-Cardstock
-felt
-ribbon
-glue gun
-Popsicle stick
-clothespin

First, paint your board.


While you're at it, paint your clothespin and Popsicle stick. Ignore that little wood nub there, it was an abandoned idea. Let's just pretend it's a Popsicle stick, kay?

My paint choice:

While that dries, fire up your Silhouette software, or whatever you plan on using to cut your letters.

Print. Or cut. Or whatever.

Place them on your newly dried board (that acrylic dries FAST!) and Mod Podge them on. Puh-lease do not make the same mistake as me and use a dirty brush. Now her board has a light dusting of glitter. Ick.

Cut out felt shapes using this template, courtesy of Tatertots & Jello. I like to cut 7 flower shapes, plus one 1 x 1 inch square for backing.

Take a flower, dab a little hot glue in the center (yes, I am totally doing this on a framed painting. My craft table is a little cluttered at the moment).

Fold in half:

Dab another drop of glue:

Fold in half again. Repeat for all your flower shapes:

Next, take your backing square and glue down 4 of your folded flowers. Here's mine with 3 of the 4 glued down:

And here it is with all four. Add a large dab of glue to the center:

Pinch together the ends of your remaining 3 "petals" and stick it on the glue dallop. Voila! Flower is done:

Glue your Popsicle stick to the top of your frame on the back (I painted mine black first--well, halfway). Then hot glue the flower on the front of it:

You're almost done! Mine looked a little too clean. So I roughed up the edges a bit with some sandpaper. Then I mixed a little of the black acrylic paint with water and brushed over the letters. It gives it a more distressed look:


Add a little ribbon for a hanger (I hot-glued that as well). Mod-Podge a little bit of scrapbook paper to the clothespin and you are finished!:


Since it's New Year's Day and all, I decided to start on my resolution and relax a little. Kiki and the kitty were so tired that you'd think they were the ones crafting all day!


I will be linking up to these parties.

Thursday, December 30, 2010

Painted Picture Frame

Remember my January to-do list? Well, it's not even the end of December yet and I've already crossed one off! I was inspired by these picture frames from Fingerprints on the Fridge and came up with this:


Cute right? I couldn't resist putting the pic of me and the lady herself on display. Really, this one is for my dear friend's birthday. But don't worry, I made one for myself too!

And I don't plan on gifting hers with that horrible picture. She gets concert tickets!:


Now that I have my Silhouette (came in last night!), I think I'll make more and add some cute vinyl.
Related Posts Plugin for WordPress, Blogger...